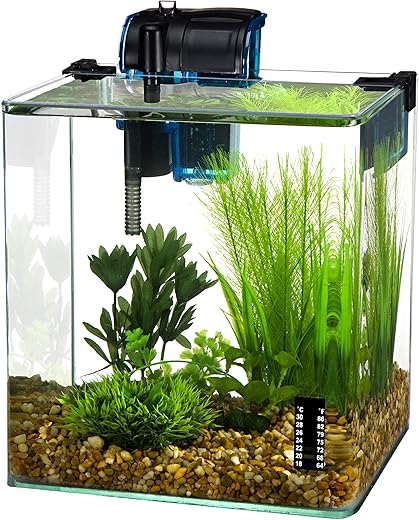
In the captivating world of aquariums, the Penn Plax Curved Corner Glass Aquarium stands out for its elegant design, but even the most beautiful tanks can harbor hidden dangers, such as leaks. Shockingly, a small leak can lead to a catastrophic water loss of up to 50 gallons a day if left unchecked! This step-by-step guide equips fish enthusiasts with practical methods to identify, troubleshoot, and repair leaks, safeguarding not only their aquatic environment but also the well-being of their fish. By following these instructions, you can ensure your aquarium remains a thriving habitat, free from the threat of water loss and structural damage.


90-Gallon Fish Tank Bursts
1. Identify the Source of the Leak
Inspect the aquarium thoroughly for any visible signs of leaks. Look for water pooling around the base or dripping from the seams, as these are strong indicators of a leak. Shine a flashlight into the corners and joints where the glass panels meet, paying close attention to these common leak points. If you observe any moisture or dampness, mark the area for further examination or repair.
2. Empty the Aquarium
Empty the aquarium by carefully removing all fish, placing them in temporary containers filled with water. Take out plants and decorations, ensuring they are also put in separate containers with sufficient water. Lower the water level in the aquarium by siphoning or scooping out water, making it shallow enough for a thorough inspection. Check for any visible cracks or leaks in the tank’s structure before proceeding with repairs.
3. Clean the Leaking Area
Empty the aquarium completely to access the leaking area. Use a soft cloth dampened with glass cleaner to wipe down the surrounding surfaces, focusing on any algae, debris, or old silicone present. Ensure you remove all residues to create a clean workspace. Inspect the area closely after cleaning to identify the leak more clearly, and prepare the surface for any necessary repairs.
4. Perform a Water Test
Fill the aquarium with water up to the suspected leak level. Observe the tank closely for any signs of dripping or leaking over a period of time. Mark the area of the leak with a piece of tape for easy reference during repairs. Ensure you check from different angles to catch any subtle leaks that may not be immediately visible.
5. Prepare for Repairs
- Confirm the leak and identify the affected area.
- Gather the necessary supplies: aquarium-safe silicone sealant, a caulking gun, and a utility knife.
- Clean the area by removing any old sealant with the utility knife.
- Ensure that the surface is completely dry before applying new sealant.
- Apply the aquarium-safe silicone sealant evenly in the affected area using the caulking gun.
6. Apply the Silicone Sealant
Load the aquarium-safe silicone sealant into the caulking gun. Position the nozzle at the leaking area and squeeze the trigger to apply a generous bead of sealant along the entire seam. Ensure each section is adequately covered, as this prevents further leaks. Smooth out the sealant using your finger or a plastic smoothing tool, applying even pressure to create a seamless finish that adheres well to the surface. Allow the sealant to cure as per the manufacturer’s instructions, typically for 24-48 hours, avoiding any disturbance during this period to ensure a strong bond.
7. Re-Test for Leaks
Fill the aquarium to the previous water level after the silicone has fully cured. Observe the seams and corners closely for any signs of moisture or dripping over the next few hours. If you notice any leaks, mark the area for further inspection or repairs. If no leaks appear during this period, confidently move on to the next step of your aquarium setup.
8. Reassemble the Aquarium
Remove your fish from the temporary holding tank and allow them to acclimate to the aquarium water gradually. Float the sealed bag containing the fish in the aquarium for about 15 minutes, then slowly mix small amounts of aquarium water into the bag every few minutes for about 30 minutes. Once acclimated, gently release the fish into the tank using a net, avoiding adding the holding tank water to the aquarium.
Carefully arrange your plants and decorations back into the aquarium, ensuring they are securely positioned to prevent shifting. After reassembling, monitor the tank closely for any signs of further leaks, such as dampness around the base or water level drops. Regularly check the seals and joints, especially after water changes or significant temperature fluctuations, to ensure the integrity of your aquarium.
Final Tips and Recommendations
In conclusion, addressing leaks in your Penn Plax Curved Corner Glass Aquarium is crucial for maintaining a healthy habitat for your aquatic creatures. By diligently inspecting for cracks, applying appropriate sealants, and conducting thorough tests after repairs, you can successfully resolve any issues. With these troubleshooting techniques, you can enjoy a leak-free aquarium and a thriving underwater ecosystem.
Essential Supplies Needed
- Bucket
- Sponge or Cloth
- Aquarium-safe silicone sealant
- Caulking gun
- Utility knife or razor blade
- Plastic scraper or putty knife
- Water for testing
- Tape measure
- Gloves
- Safety goggles

Leak Detection Strategies
- Inspect the Seams: Carefully examine all the silicone seams for any visible cracks or gaps where water might be escaping
- Dry the Exterior: Wipe down the outside of the aquarium to ensure that any moisture is not misleading you about the source of the leak
- Perform a Water Test: Fill the aquarium slowly with water to just below the top, and monitor for any signs of leakage over a 24-hour period
- Check for Condensation: Look for condensation on the outside of the tank, which can indicate a leak or high humidity levels inside
- Use a Flashlight: Shine a flashlight along the seams and corners to help illuminate any potential leaks that may not be visible in normal light
- Examine the Base: Inspect the bottom of the aquarium, including the corners, as leaks often occur where the glass meets the substrate
- Look for Bubbles: When the aquarium is filled with water, watch for air bubbles forming along the seams, which can indicate a weak seal
- Remove Decorations: Temporarily remove any decorations or substrates that might obstruct your view of the seams for a clearer inspection
- Test with Food Coloring: Add a few drops of food coloring near the seams; if it seeps out, you’ve found the source of the leak
- Assess Water Pressure: Consider the water pressure in the tank; if it’s too high, it may exacerbate leaks, especially in older tanks
- Consult Manufacturer Guidelines: Review any troubleshooting guides provided by Penn Plax for specific recommendations related to their aquariums
- Use Silicone Sealant: If a leak is found, apply aquarium-safe silicone sealant to the affected area and allow it to cure fully before refilling
- Monitor Regularly: After repairs, check the aquarium regularly for signs of new leaks, especially after water changes or maintenance
- Seek Professional Help: If you’re unable to locate or fix the leak, consider consulting with an aquarium professional for assistance
Step-by-Step Guide to Setting Up and Maintaining Your Penn Plax Curved Corner Glass Aquarium
- Set Up the Aquarium: Start by choosing a suitable location for the Penn Plax Curved Corner Glass Aquarium. Ensure it’s on a stable surface away from direct sunlight and heat sources. Rinse the tank with water (no soap) before adding substrate
- Add Substrate and Decorations: Layer the bottom with aquarium substrate, such as gravel or sand, to a depth of about 1-2 inches. Decorate with plants, rocks, and hiding spots to create a natural environment for your fish
- Install Equipment: Set up the filtration system and heater (if needed) according to the manufacturer’s instructions. Make sure the filter is appropriate for the size of your aquarium and provides adequate water circulation
- Fill with Water: Slowly fill the aquarium with dechlorinated water to avoid disturbing the substrate and decorations. Use a plate or bowl to deflect the water flow while filling
- Cycle the Tank: Before adding any fish, cycle the tank to establish beneficial bacteria. This process can take several weeks. Monitor water parameters like ammonia, nitrite, and nitrate to ensure a safe environment for your fish
Everything You Need to Know About Your Penn Plax Curved Corner Aquarium
Are there any specific maintenance tips for keeping the aquarium clean and clear?
Yes, there are several effective maintenance tips for keeping an aquarium clean and clear:
- Regular Water Changes: Perform partial water changes (about 10-20% per week) to remove waste and toxins, and replenish essential minerals.
- Filter Maintenance: Clean or replace filter media regularly, as filters are crucial for removing debris and maintaining water quality. However, avoid cleaning everything at once to preserve beneficial bacteria.
- Vacuum the Substrate: Use a gravel vacuum during water changes to remove uneaten food, waste, and detritus that accumulate in the substrate.
- Monitor Water Parameters: Regularly test for ammonia, nitrite, nitrate, pH, and hardness to ensure optimal conditions for fish health and to identify any potential issues early.
- Limit Overfeeding: Feed fish only what they can consume in a few minutes to reduce excess waste and prevent algae growth.
- Remove Algae: Clean algae from the glass and decorations as needed, using a scraper or algae pad. Consider adding algae-eating fish or invertebrates to help control growth.
- Maintain Proper Lighting: Ensure your aquarium has a proper light cycle (typically 8-12 hours of light per day) to prevent excessive algae growth.
- Introduce Live Plants: Live plants can help absorb excess nutrients and improve water quality, creating a more balanced environment.
- Avoid Overcrowding: Be mindful of the number of fish in your aquarium to prevent overloading the biological filter and maintain a stable ecosystem.
By following these tips, you can help keep your aquarium clean, clear, and a healthy environment for your aquatic life.
Is the aquarium suitable for both freshwater and saltwater setups?
The suitability of an aquarium for both freshwater and saltwater setups depends on its design and equipment. Generally, standard glass aquariums can be used for either type of setup, but they have different requirements.
Freshwater aquariums typically need less specialized equipment, such as a simple filtration system and heater. In contrast, saltwater aquariums require more advanced filtration, including protein skimmers, and specific salt mixes to maintain the correct salinity levels.
If you plan to switch between freshwater and saltwater, ensure that the aquarium is properly cleaned and all equipment is suitable for the type of water you intend to use. Additionally, it’s best to avoid using the same substrate or decorations between the two setups to prevent contamination.
What kind of filtration system is recommended for the Penn Plax Curved Corner Glass Aquarium?
For the Penn Plax Curved Corner Glass Aquarium, a filtration system that is commonly recommended is a hang-on-back (HOB) filter. These filters are effective for maintaining water quality in aquariums and are suitable for the curved design of the tank. Additionally, canister filters can also be a good option, especially for larger setups, as they provide powerful filtration and can be hidden out of sight. It’s important to choose a filter that matches the size and bioload of the aquarium to ensure optimal water clarity and health for the aquatic life.

